
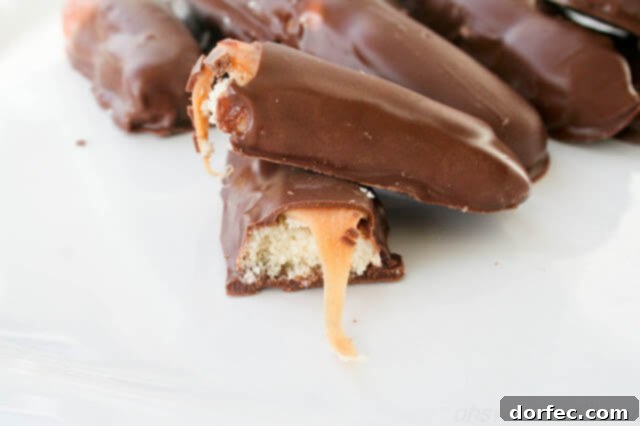
Unlock the secret to irresistible sweet treats with our guide to crafting perfect homemade Twix candy bars. Forget store-bought versions; there’s a unique satisfaction that comes from creating a beloved classic in your own kitchen. Imagine biting into a crisp, buttery shortbread base, followed by a luscious layer of chewy caramel, all enveloped in a smooth, rich chocolate coating. This isn’t just a recipe; it’s an invitation to experience candy-making magic, transforming simple ingredients into a confectionary masterpiece.
For many, candy bars like Twix evoke a sense of childhood nostalgia, a delightful indulgence that brightens any day. While we often lean towards the warmth and comfort of freshly baked cookies, there are those moments when only a candy bar will do. That spark of inspiration struck during a quiet movie night, prompting the exciting challenge: could we replicate that iconic Twix taste at home? The answer, as you’ll soon discover, is a resounding yes!
Our journey began with a simple idea, fueled by a craving for that perfect combination of textures and flavors. After some experimentation, the result was a triumph of taste, even if the very first batch didn’t win any beauty contests due to time constraints. What truly mattered was the authentic Twix flavor that shone through, proving that homemade truly can be better.
Making your own Twix bars offers several advantages beyond just the incredible taste. You have complete control over the quality of ingredients, opting for premium butter, rich chocolate, and fresh caramel components. This allows for a superior flavor profile and texture that often surpasses mass-produced candy. Furthermore, there’s immense personal satisfaction in presenting a tray of these golden, chocolate-covered delights, knowing you’ve handcrafted every delicious component.
The Anatomy of a Perfect Homemade Twix Bar
The magic of a Twix bar lies in its distinct layers, each contributing a unique element to the overall experience. Understanding and perfecting each component is key to achieving that authentic taste and texture.
The Buttery Shortbread Base
The foundation of our homemade Twix is a tender, crumbly shortbread. This classic biscuit, with its rich buttery flavor, provides the perfect contrast to the sweet caramel and chocolate. The simplicity of shortbread ingredients—flour, sugar, and butter—belies the depth of flavor it imparts. Achieving the ideal crisp-yet-tender texture is crucial. A key step, which some might be tempted to skip, is chilling the shortbread dough. This allows the butter to firm up, preventing the cookies from spreading too much during baking and ensuring a crispier bite, which many argue is essential for an authentic Twix experience. We’ll delve deeper into shortbread in our FAQ section, but for now, trust that a good shortbread is the soul of these candy bars.
The Golden Caramel Core
Nestled atop the shortbread is a thick, gooey layer of golden caramel. This is where the bar gets its characteristic chewiness and rich, sweet depth. While homemade caramel can be a labor of love, our recipe simplifies the process using readily available caramel squares, melted down to a silky-smooth consistency with a touch of evaporated milk. The trick here is to work efficiently, as caramel can firm up quickly, but don’t worry – a quick zap in the microwave can always bring it back to its pliable state. This caramel layer needs to strike the perfect balance: firm enough to hold its shape but soft enough to provide that satisfying, stretchy pull when you bite into it.
The Irresistible Chocolate Coating
Finally, each bar is generously coated in a decadent layer of milk chocolate. This final flourish not only provides a smooth, satisfying crunch but also seals in the caramel and shortbread, completing the classic Twix profile. The choice of chocolate is important; we recommend a good quality almond bark or melting chocolate, as it provides a shiny, hard shell that snaps beautifully without being overly brittle. The temperature of the melted chocolate is a subtle but vital detail – too hot, and it might melt the caramel and shortbread layers; too cool, and it won’t coat smoothly. A brief cooling period for the melted chocolate ensures a flawless finish.
These are so much easier to make than you might think. You could whip them up for your next game day gathering, and they would undoubtedly be devoured! Working with caramel requires a bit of speed; if it begins to stiffen, simply microwave it for a few seconds at a time until it’s smooth and pliable once more. Similarly, allow the melted chocolate to cool for a minute before dipping the bars. This prevents the shortbread and caramel from separating due to excessive heat, ensuring your homemade Twix bars hold together perfectly.
Homemade Twix Candy Bars: A Detailed Recipe Guide
Homemade Twix Candy Bars
By Sweet Basil
Prep Time: 1 hr 30 mins
Cook Time: 20 mins
Total Time: 1 hr 50 mins
Servings: 36
Sometimes you just need a Twix candy bar, especially Homemade Twix Candy Bars. This recipe guides you through creating these delightful treats from scratch, ensuring a perfect balance of crispy shortbread, chewy caramel, and smooth chocolate.
Ingredients
Shortbread
- 4 Cups All Purpose Flour
- 1 Pinch Salt
- 1 1/2 teaspoon Vanilla Extract
- 1 Cup Granulated Sugar
- 4 Sticks Butter (2 cups), unsalted and softened
Caramel
- 2 Cups Caramel Squares (or 1 Bag), unwrapped
- 2 Tablespoons Evaporated Milk
Chocolate Coating
- 1 Package Almond Bark, Milk Chocolate variety
Instructions
For the Shortbread
- Combine all shortbread ingredients (flour, salt, vanilla, sugar, and softened unsalted butter) in the bowl of a standing mixer fitted with a paddle attachment.
- Mix on low speed until the ingredients just begin to come together, forming a crumbly mixture. Increase the speed to medium until a cohesive ball of dough forms.
- Transfer the dough onto a piece of plastic wrap and flatten it into a disk.
- Place the flattened dough in the refrigerator for at least 1 hour. This chilling step is optional but recommended for a crispier shortbread.
- On a lightly floured surface, roll out the chilled dough to about 1/4 to 1/2 inch thick. Using a sharp knife or pizza cutter, slice the dough into “sticks” resembling the classic candy bar shape. For a better caramel hold, create a very small channel or indentation down the center of each stick using your finger or the back of a spoon.
- Preheat your oven to 350°F (175°C). Arrange the shortbread sticks on a baking sheet lined with parchment paper.
- Bake for 10-12 minutes, or until the edges are lightly golden.
- Remove from the oven and let cool completely on the baking sheet on a wire rack.
For the Caramel Layer
- In a microwave-safe bowl, combine the unwrapped caramel squares and evaporated milk.
- Heat in the microwave in 30-second intervals, stirring thoroughly after each interval, until the caramel is completely smooth and melted.
- Allow the melted caramel to cool for just a minute or two to thicken slightly and prevent it from being too hot for the shortbread.
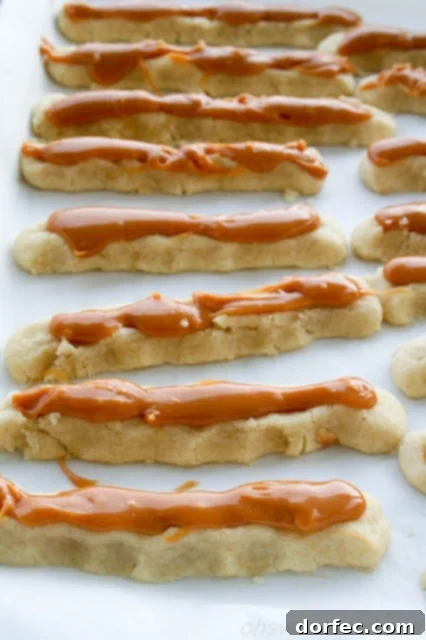
- Using a teaspoon or a small piping bag, scoop or drizzle a line of caramel down the length of each cooled shortbread stick. You can use your finger to gently guide the caramel into the channel you created earlier.
- Let the caramel harden for a few minutes, or until it’s set and no longer sticky to the touch.
For the Chocolate Coating
- Break the almond bark into pieces and place it in a microwave-safe dish. A Pyrex 8×8 inch dish works well for easier dipping.
- Heat in the microwave in 30-second intervals, stirring occasionally, until the chocolate is completely smooth and melted.
- Allow the melted chocolate to cool for a minute.
- Dip each caramel-topped shortbread bar into the melted chocolate. Use a fork to gently push chocolate over the top of the candy, ensuring it’s fully coated. Carefully lift the bar with the fork, allowing any excess chocolate to drip off.
- Place the chocolate-coated bars on a baking sheet lined with parchment paper.
- Let the chocolate harden completely at room temperature or in the refrigerator for quicker setting.
- Enjoy your homemade Twix candy bars!
- These delicious treats can be stored in an airtight container at room temperature for several days, or frozen for longer enjoyment.
Recipe Notes
Store in an airtight container in a cool location to maintain freshness and prevent melting.
Nutrition Information (Approximate per serving)
- Serving: 1g
- Calories: 254kcal
- Carbohydrates: 28g
- Protein: 2g
- Fat: 15g
- Saturated Fat: 11g
- Cholesterol: 27mg
- Sodium: 97mg
- Potassium: 20mg
- Fiber: 1g
- Sugar: 17g
- Vitamin A: 316IU
- Calcium: 7mg
- Iron: 1mg
Nutrition information is automatically calculated, so should only be used as an approximation.
Expert Tips for Homemade Twix Success
Crafting perfect homemade Twix bars is a rewarding experience, and a few simple tips can elevate your results from good to absolutely amazing. First, regarding the shortbread, while the recipe suggests chilling for an hour, for an extra-crisp texture that many connoisseurs appreciate, consider extending the chilling time to a full two hours or even overnight. This really helps firm up the butter and prevents the shortbread from becoming too soft during baking. When rolling out the dough, aim for consistent thickness to ensure even baking and a uniform bite in every bar. Also, don’t skimp on creating that slight indentation on the shortbread; it truly acts as a little ‘canal’ to keep your caramel neatly in place.
For the caramel layer, working quickly is indeed key, as stated in the recipe. However, don’t let it stress you out. Have your cooled shortbread sticks ready and arranged before you even start melting the caramel. This way, you can move directly from melting to applying without delay. If your caramel does start to firm up in the bowl, a quick 10-15 second burst in the microwave, followed by a stir, should restore its smooth, drizzly consistency. Lastly, for the chocolate coating, the temperature truly matters. Melting your almond bark gently and allowing it to cool slightly will ensure a beautiful, non-streaky, and firm chocolate shell. You’ll want it warm enough to be liquid, but not hot enough to melt your caramel or shortbread upon contact. A double-boiler method or short microwave bursts (stirring well each time) are excellent ways to control temperature.
Frequently Asked Questions
Is Shortbread A Cookie?
Traditionally, shortbread is classified as a biscuit, especially in its native Scotland. The distinction between a cookie and a biscuit can vary by region, but in essence, shortbread is a rich, crumbly baked good made from a simple recipe of one part white sugar, two parts butter, and three parts oat or wheat flour. Unlike many cookies, shortbread typically doesn’t contain leavening agents like baking powder or baking soda, resulting in its dense, firm, and crumbly texture. Its high butter content contributes to its distinctive melt-in-your-mouth quality. Over centuries, shortbread has evolved from a medieval ‘biscuit bread’ to the celebrated sweet treat we know today, often associated with holidays and special occasions.
Could You Substitute Salted Butter For Unsalted Butter?
While it’s generally best to stick to the type of butter specified in a recipe for consistent results, you absolutely can substitute salted butter for unsalted butter if that’s all you have on hand. However, you’ll need to make a slight adjustment to the amount of added salt in the recipe to avoid an overly salty taste. As a general rule, for every 1/2 cup (or 1 stick) of salted butter you use instead of unsalted, you should decrease the amount of salt called for in the recipe by 1/4 teaspoon. This adjustment helps maintain the intended flavor balance. Unsalted butter is preferred in baking because it gives the baker precise control over the overall salt content, allowing for better fine-tuning of flavors.
Storage and Enjoyment
Once your homemade Twix candy bars have fully set, storing them properly will ensure they remain fresh and delicious for as long as possible. Place the bars in an airtight container at room temperature in a cool, dry place. They will typically stay fresh for up to one week. If you live in a warmer climate or want to extend their shelf life, storing them in the refrigerator can keep them fresh for up to two weeks. Just be sure to let them come to room temperature for a few minutes before serving to enjoy the best texture. For longer storage, these candy bars freeze beautifully! Wrap individual bars tightly in plastic wrap, then place them in a freezer-safe bag or container. They can be stored in the freezer for up to three months. Thaw them in the refrigerator overnight or at room temperature for a few hours before indulging. These homemade Twix bars also make fantastic gifts; package them in decorative boxes or bags for a truly personal and appreciated present.
There’s nothing quite like the satisfaction of biting into a treat you’ve made yourself, especially when it recreates a beloved classic so perfectly. These homemade Twix candy bars are a testament to that joy – a delightful project that yields incredibly delicious results. So, roll up your sleeves, gather your ingredients, and prepare to impress yourself and everyone lucky enough to try these irresistible shortbread, caramel, and chocolate sensations. Happy baking!