
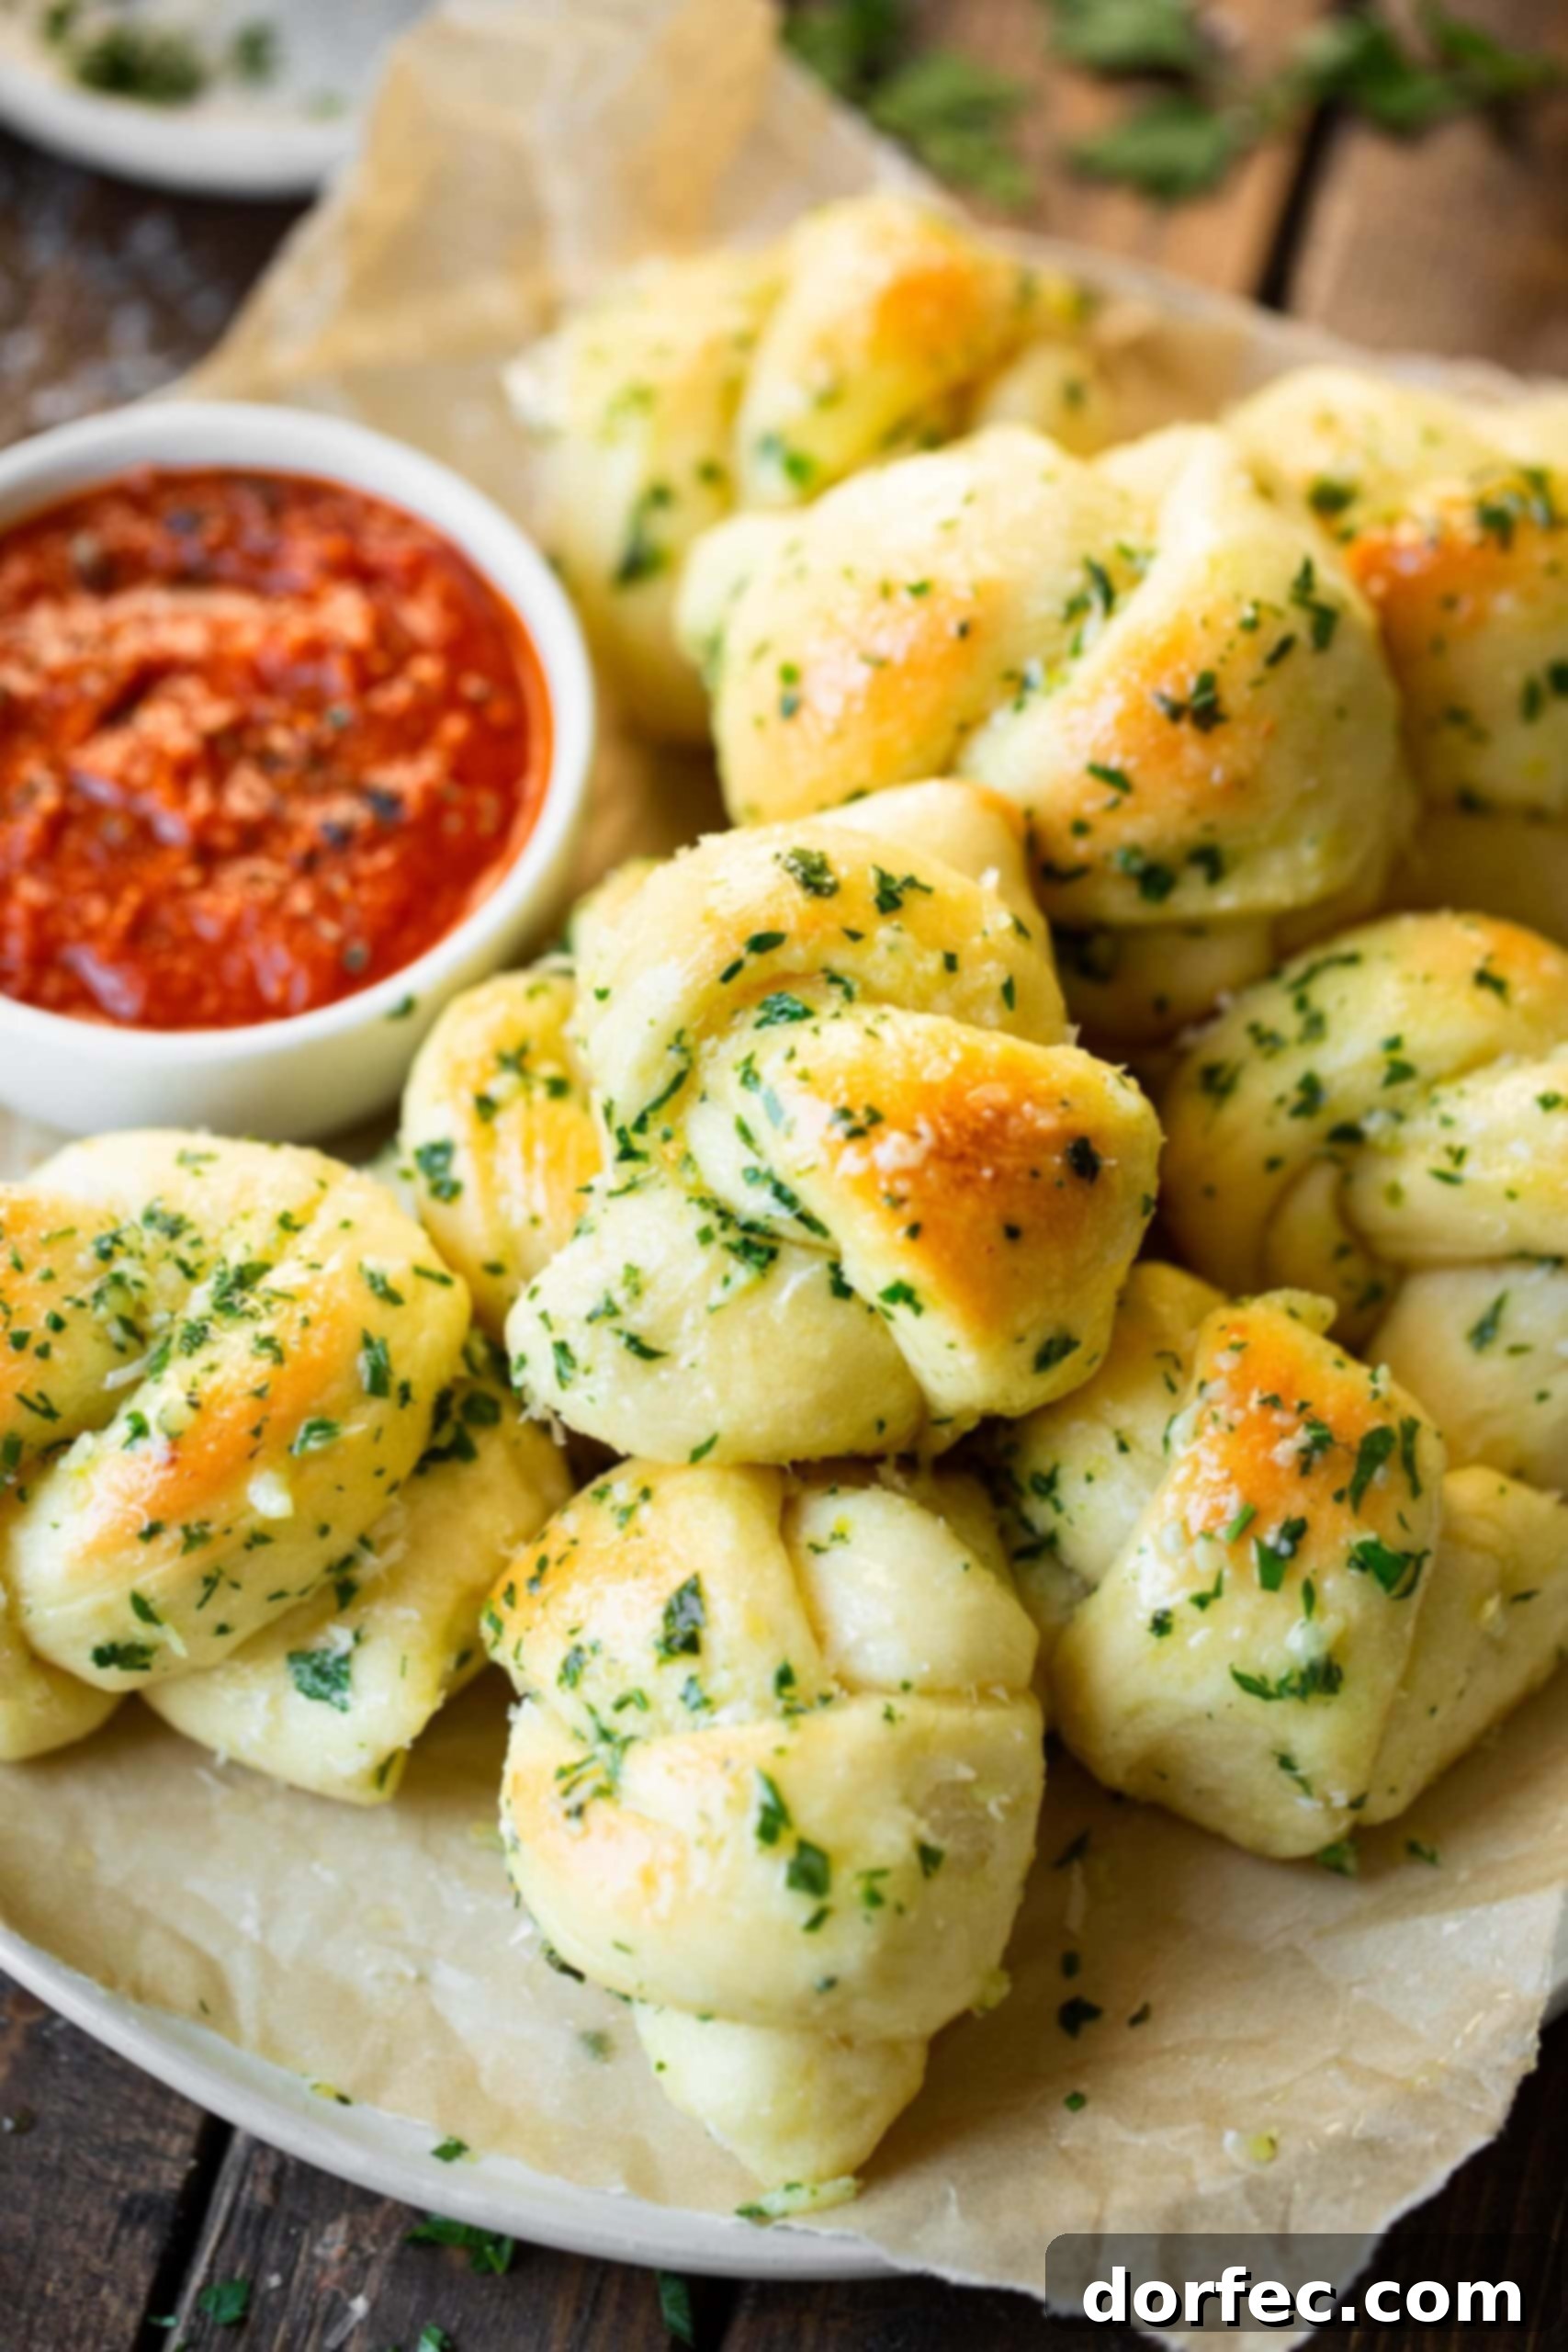
Homemade Garlic Knots: Your Ultimate Buttery, Soft, and Irresistible Side Dish
Imagine a warm, fluffy bread roll, generously drenched in a savory garlic butter, sprinkled with fresh parsley and grated Parmesan cheese. This isn’t just a dream; it’s the reality of these homemade buttery garlic knots! Perfect for pizza night, pasta dinners, or simply as an appetizer that disappears in minutes, these soft, delectable knots are an absolute game-changer. Forget store-bought options or even ordering them from your favorite pizzeria; once you taste the homemade difference, there’s no turning back. We’ve spent years perfecting this recipe, ensuring every bite delivers that irresistible garlicky, buttery goodness that truly elevates any meal.
For years, my partner Cade and I have been on a quest for the perfect garlic knot. It wasn’t just a culinary endeavor; it was a necessity. Can you truly enjoy pizza without the perfect accompaniment of garlic knots or cheesy bread? We certainly couldn’t! This pursuit led us to countless experiments, fine-tuning every detail from the dough’s texture to the richness of the garlic butter. We discovered that while a simple garlic season salt is convenient, layering flavors with fresh garlic, garlic salt, and vibrant fresh parsley creates a depth of taste that is unparalleled. And the secret to truly exceptional knots? A double dose of that glorious garlic butter – once before baking to infuse the dough with flavor, and again after, for a glistening, aromatic finish. Trust us, this extra step is worth every bit of effort for knots that are consistently soft, wonderfully buttery, and utterly unforgettable.
Key Ingredients for the Best Garlic Knots
Crafting these heavenly garlic knots requires a surprisingly simple list of ingredients, primarily focusing on quality dough, decadent butter, and, of course, an abundance of aromatic garlic. While the basics are straightforward, each component plays a crucial role in achieving that perfect taste and texture. Here’s a detailed breakdown of your grocery list and why each item is essential:
For the Fluffy Dough:
- All-Purpose Flour: The foundation of our soft, airy knots. All-purpose flour provides the ideal protein content for a dough that is both pliable and develops a tender crumb when baked.
- Instant Yeast: This magical ingredient is what gives our knots their wonderful rise and fluffy texture. Instant yeast is a baker’s best friend as it doesn’t require proofing beforehand, saving you time and ensuring a quicker path to deliciousness.
- Salt: More than just a seasoning, salt is vital for controlling yeast activity and enhancing the overall flavor of the bread. Don’t skip it, as it balances the sweetness and brings out the savory notes.
- Sugar: A small amount of granulated sugar not only adds a touch of sweetness but also acts as food for the yeast, helping it activate and produce a robust rise. It also contributes to that beautiful golden-brown crust.
- Soy Lecithin: This emulsifier is our secret weapon for an incredibly soft and pliable dough. It improves the dough’s elasticity and extends the freshness of your baked knots, keeping them tender for longer. A nickel-sized amount is all you need for impressive results.
- Warm Water: The perfect temperature for activating instant yeast is crucial. Water that’s too cold won’t wake the yeast up, and water that’s too hot can kill it. Aim for lukewarm water, around 105-115°F (40-46°C), to ensure your dough rises beautifully.
For the Irresistible Garlic Butter:
- Unsalted Butter: We use unsalted butter to have complete control over the saltiness of the final product. You’ll be using plenty of it, ensuring every knot is bathed in rich, buttery flavor.
- Fresh Garlic: Minced fresh garlic is non-negotiable for that pungent, authentic garlic punch. While garlic powder has its place, nothing compares to the vibrant aroma and taste of fresh cloves.
- Garlic Salt: This adds another layer of garlic flavor while also providing the necessary seasoning for the butter. It’s a convenient way to boost both taste and saltiness.
- Fresh Parsley: Finely chopped fresh parsley introduces a bright, herbaceous note that cuts through the richness of the butter and adds a lovely pop of color. It’s a classic pairing for a reason!
- Parmesan Cheese: Freshly grated Parmesan cheese adds a salty, umami depth and a delightful texture to the topping. It’s sprinkled on after baking, creating a savory crust that complements the warm bread.
- Pizza Sauce: While not part of the knots themselves, a good pizza sauce is the ultimate dipping companion, tying the whole pizza night experience together.
The precise measurements for each of these ingredients can be found in the comprehensive recipe card, located towards the end of this article, ensuring you have all the details at your fingertips for baking success.
How to Make the Perfect Garlic Knots: Step-by-Step
Making these homemade garlic knots is a straightforward and rewarding process, even for novice bakers. The dough recipe is designed for simplicity and yields consistently fluffy, tender results that will impress everyone. Let’s walk through each step to ensure your garlic knots turn out perfectly every time.
Preparing the Dough:
- Combine Dry Ingredients: In the bowl of a stand mixer, fitted with the dough hook attachment, combine the all-purpose flour, instant yeast, salt, and granulated sugar. Mix on low speed for about 30 seconds until all the dry ingredients are thoroughly incorporated. This ensures even distribution of the leavening agents and seasonings.
- Add Soy Lecithin: With the mixer still running on low, add the nickel-sized amount of soy lecithin. Continue mixing for another minute to fully integrate this dough-softening agent.
- Incorporate Warm Water: Gradually pour in the warm water while the mixer continues to run on low. Once all the water is added, increase the speed to medium and mix for approximately 2 minutes. The dough should come together, pulling away from the sides of the bowl, forming a smooth, elastic ball. If the dough seems too sticky, add a tablespoon of flour at a time; if too dry, add a teaspoon of water.
- First Rise (Resting): Remove the bowl from the mixer. Cover the bowl tightly with a clean kitchen towel or plastic wrap and allow the dough to rest in a warm place for about 30 minutes. This initial resting period allows the yeast to begin its work and the gluten to relax, making the dough easier to handle.
- Roll and Slice the Dough: Lightly flour a clean work surface. Turn the rested dough out onto the floured surface and gently roll it into a rectangle, about 1/4 inch thick. Using a pizza cutter or a sharp knife, slice the dough in half horizontally (from left to right). Then, cut each half into strips, approximately 1 inch wide and 6-8 inches long. The exact dimensions aren’t critical, but aim for consistency.
- Form the Knots: Take each strip of dough and tie it into a loose knot. Don’t worry about perfection; rustic charm is part of their appeal! (Refer to the “How to Tie Knots in Dough” section below for detailed guidance.) Arrange the tied knots in a lightly greased 9×13 inch baking pan, leaving a little space between each for expansion.
- Second Rise: Cover the baking dish again with a kitchen towel or plastic wrap and let the knots rise in a warm spot for another 15-30 minutes. They should appear visibly puffy and slightly larger. While they are rising, preheat your oven to 400°F (200°C).
Preparing the Garlic Butter and Baking:
- Prepare Garlic Butter: While the knots are rising, melt the unsalted butter in a small saucepan or microwave-safe bowl. Stir in the minced fresh garlic, garlic salt, and half of the fresh chopped parsley.
- First Butter Brush & Bake: Once the knots have risen, gently brush half of the prepared garlic butter mixture evenly over the tops of the knots in the baking dish. Place the pan in the preheated oven and bake for 15-20 minutes, or until the knots are golden brown and cooked through.
- Second Butter Brush & Serve: As soon as the garlic knots come out of the oven, brush them immediately with the remaining garlic butter. This second application ensures maximum flavor and a beautiful, glistening finish. Sprinkle liberally with the freshly grated Parmesan cheese and the remaining fresh parsley. Serve hot with your favorite pizza sauce for dipping, and watch them disappear!
These detailed instructions, along with precise ingredient quantities, are conveniently laid out in the recipe card below, ensuring your homemade garlic knots are nothing short of spectacular.
Mastering the Art of Tying Dough Knots
Tying the dough into knots might seem intimidating at first, but it’s surprisingly simple and adds a lovely artisanal touch to your homemade garlic knots. Once you have your dough strips ready, follow these easy steps:
- Hold the Strip: Take one dough strip, holding one end in each hand.
- Form an ‘X’: Cross the ends over each other to form an “X” shape in the middle. One end will be underneath, and one on top.
- Tuck and Pull: Take the end that is currently underneath and bring it up, tucking it through the loop created by the “X.” Pull gently to tighten the knot.
- Finishing Touches: You have a couple of options for the ends: you can leave them sticking out for a more rustic look, or you can gently tuck them under the knot to create a neater, more compact shape (as shown in the accompanying photos).
Don’t worry if your first few aren’t perfect – practice makes perfect, and they will still taste amazing no matter how they look! The goal is a loose knot that allows the dough to expand during the final rise and baking.
What to Serve with Your Delicious Garlic Knots
These versatile homemade garlic knots are far too delicious to be reserved for just one occasion! While they are an absolute staple for pizza night, their rich, savory flavor and tender texture make them a perfect accompaniment to a wide array of dishes. Here are some of our favorite ways to enjoy them:
- The Ultimate Pizza Companion: Whether you’re making homemade pizza or ordering in, garlic knots are the quintessential side. Their buttery garlic flavor perfectly complements a cheesy slice, especially when dipped in extra marinara.
- Hearty Soups and Stews: Garlic knots are fantastic for soaking up the flavorful broths of your favorite soups and stews. Imagine dunking a warm knot into a rich beef stew or a creamy chicken noodle soup on a chilly evening. The texture and flavor add an extra dimension to the meal.
- Gnocchi Chicken Soup
- Beef Stew
- Chicken Noodle Soup
- Saucy Pasta Dishes: Pair these garlic knots with your favorite pasta for a complete and satisfying Italian-inspired meal. They are ideal for scooping up every last drop of a luscious Alfredo sauce or a robust spaghetti sauce.
- Fettuccine Alfredo
- Baked Spaghetti Pie
- Appetizer Extravaganza: Serve them as a standalone appetizer at parties or gatherings. Arrange them beautifully on a platter with various dipping sauces like classic marinara, creamy alfredo, a vibrant pesto, or even a spicy arrabiata. They are guaranteed to be a crowd-pleaser and disappear quickly!
- With Salads: Add a savory, bready component to a crisp green salad or a hearty Caesar salad. The garlic knots offer a wonderful contrast in texture and flavor.
- As a Snack: Sometimes, you just need a warm, comforting snack. These garlic knots are perfect on their own, a delightful treat any time of day.
No matter the occasion, these homemade garlic knots are guaranteed to elevate your dining experience, adding a touch of buttery, garlicky magic to every bite. They truly go with all the pizzas out there!
Can You Freeze Homemade Garlic Knots?
One of the best things about these garlic knots is how well they freeze, allowing you to enjoy their fresh-baked goodness whenever a craving strikes! You have the flexibility to freeze them either before or after baking, making meal prep incredibly convenient.
Freezing After Baking:
If you’ve already baked a batch and have leftovers (a rare occurrence!), simply allow the garlic knots to cool completely to room temperature. This prevents ice crystals from forming. Once cool, wrap them tightly in plastic wrap, then an additional layer of aluminum foil, or place them in a heavy-duty freezer bag. They can be frozen for up to 2 months. To reheat, simply thaw them to room temperature and then warm them gently in the microwave for a few seconds, or in a preheated oven at 350°F (175°C) for 5-10 minutes, until heated through and soft.
Freezing Before Baking (for Fresh-Baked Anytime!):
For the ultimate fresh-baked experience, you can freeze the dough after shaping it into knots. Once you’ve tied the rolls, arrange them on a baking sheet lined with parchment paper, ensuring they don’t touch. Freeze them until solid (this usually takes 1-2 hours). Once solid, transfer the frozen knots to a heavy-duty freezer bag or an airtight container, removing as much air as possible. They can be stored in the freezer for up to 3 months.
When you’re ready to bake, remove the desired number of frozen knots from the freezer and place them on a baking sheet lined with parchment paper. Cover them lightly with plastic wrap and let them thaw and rise at room temperature for about 2 hours, or until they are visibly puffy. The exact time will depend on your room’s temperature. Once risen, bake them according to the instructions in the recipe card (Step 9), brushing with garlic butter before and after baking. This method allows you to have warm, fresh garlic knots ready in under an hour, perfect for unexpected guests or spontaneous pizza nights!
How Long Will Garlic Knots Keep?
To enjoy your homemade garlic knots at their freshest, proper storage is key. If stored in an airtight container at room temperature, they will maintain their deliciousness for 2-3 days. For a slightly longer shelf life, you can store them in an airtight container in the refrigerator, where they will last for 4-5 days. Always make sure they are completely cooled before storing to prevent condensation, which can make them soggy.
Are you ready to bring these incredible buttery, soft, and utterly irresistible garlic knots to your kitchen? Just reading about them makes me want to head straight to the oven! They are truly a labor of love that pays off with every garlicky, tender bite. Don’t hesitate to give this recipe a try; your taste buds will thank you!
More Bread Recipes You Can’t Resist:
If you love baking homemade bread, be sure to check out some of our other fantastic recipes:
- Herb Focaccia Bread: A wonderfully aromatic and versatile flatbread.
- Irish Soda Bread: Quick and easy, with a savory twist.
- No Knead Artisan Bread: Perfect for beginners, delivering bakery-quality results.
- Homemade Flour Tortillas: Soft, fresh, and far superior to store-bought.
- Easy Homemade Naan: The perfect fluffy flatbread for curries and dips.
- More Delicious Bread Recipes
Garlic Knots Recipe
By Sweet Basil
Ingredients
Dough
- 5 1/2 Cups All-Purpose Flour
- 1 1/2 teaspoons Instant Yeast
- 1 1/2 teaspoon Salt
- 1/4 Cup Granulated Sugar
- 1 1/2 Drops Soy Lecithin (nickel sized)
- 2 Cups Warm Water
Garlic Butter
- 1/2 Cup Unsalted Butter
- 7 Cloves Garlic, minced
- 1 1/2 teaspoons Garlic Salt
- 1/2 Cup Parsley, fresh, chopped
- 1/3 Cup Parmesan Cheese, freshly grated
- Homemade Pizza Sauce (for serving)
Instructions
- Place the all-purpose flour, instant yeast, salt, and granulated sugar in a mixer with the dough hook attachment and mix until combined.
- Add the soy lecithin and mix again until fully incorporated.
- With the mixer on low speed, slowly add the warm water. Mix for 2 minutes or until the dough pulls entirely away from the mixing bowl and is smooth and elastic.
- Remove the bowl from the mixer, cover with a towel, and let it rest in a warm place for 30 minutes.
- Roll out the dough to about 1/4″ thick on a lightly floured surface. Slice the dough in half horizontally, then cut both pieces into strips (approximately 1 inch wide).
- Tie each strip into a bread dough knot (take an end in each hand, cross like an X, tuck one end through the hole). Place the knots in a greased 9×13″ baking pan.
- Melt the unsalted butter, then stir in the minced garlic, garlic salt, and half of the fresh chopped parsley to create the garlic butter mixture.
- Allow the knots to rise in the baking pan for 15-30 minutes, or until visibly puffy. Preheat oven to 400°F (200°C).
- Brush the risen knots with half of the prepared garlic butter. Bake at 400°F (200°C) for 15-20 minutes, or until golden brown.
- Immediately after baking, brush the hot knots with the remaining garlic butter and sprinkle generously with freshly grated Parmesan cheese and the rest of the fresh parsley. Serve warm with pizza sauce.
Nutrition
Serving: 1 Knot, Calories: 312kcal, Carbohydrates: 49g, Protein: 8g, Fat: 9g, Saturated Fat: 5g, Polyunsaturated Fat: 1g, Monounsaturated Fat: 2g, Trans Fat: 1g, Cholesterol: 22mg, Sodium: 633mg, Potassium: 102mg, Fiber: 2g, Sugar: 4g, Vitamin A: 469IU, Vitamin C: 4mg, Calcium: 52mg, Iron: 3mg
Nutrition information is automatically calculated, so should only be used as an approximation.
We absolutely love hearing from you! If you try this recipe, please leave a comment below and share your experience. Your feedback helps us and other readers.
REMEMBER TO SUBSCRIBE TO our FREE Oh Sweet Basil NEWSLETTER AND RECEIVE EASY RECIPES DELIVERED INTO YOUR INBOX EVERY DAY!
When you try a recipe, please use the hashtag #ohsweetbasil on INSTAGRAM for a chance to be featured in our stories! FOLLOW OH, SWEET BASIL ON FACEBOOK | INSTAGRAM | PINTEREST | TWITTER FOR ALL OF OUR LATEST CONTENT, RECIPES AND STORIES.