
The Ultimate No-Bake Chocolate Peanut Butter Pie: A Dream Come True
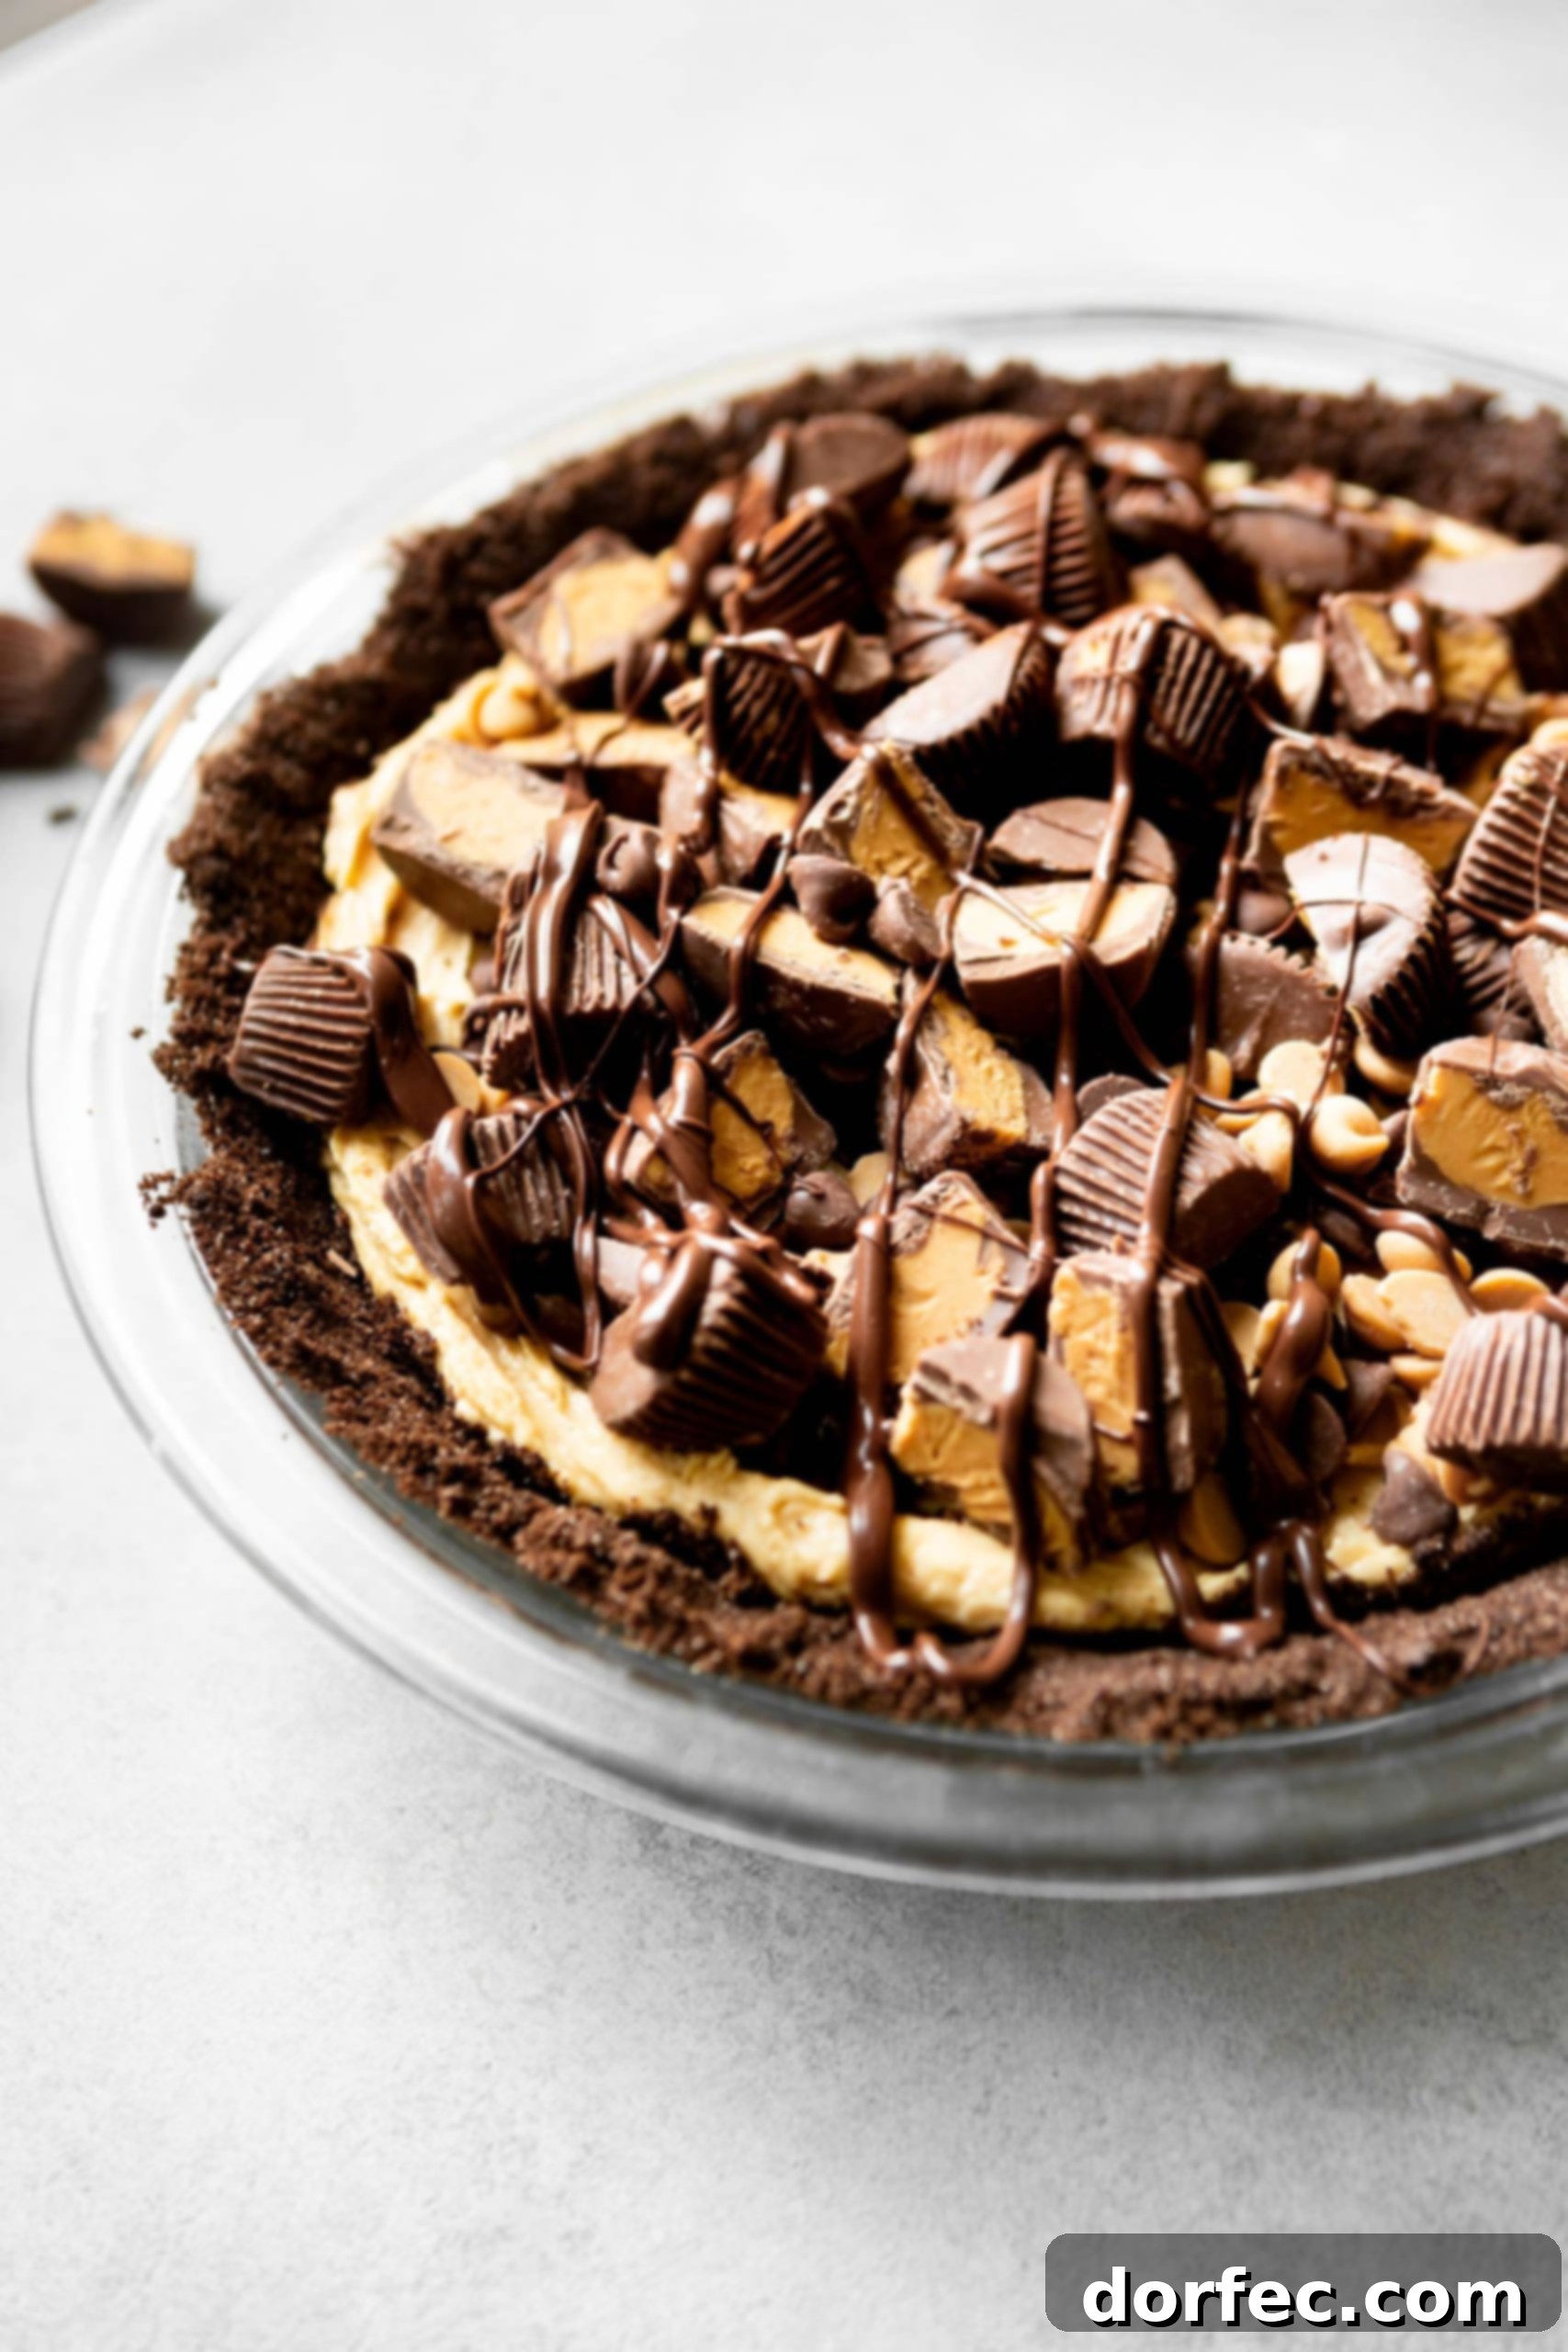
Prepare yourself for an extraordinary dessert experience with this Ultimate No-Bake Peanut Butter Pie Recipe. Imagine a rich, crumbly chocolate pie crust, generously filled with a velvety smooth, dreamy peanut butter concoction, then absolutely lavishly covered with a cascade of Reese’s Peanut Butter Cups, sweet peanut butter chips, and delectable chocolate chips. This isn’t just a pie; it’s a celebration of the perfect pairing: chocolate and peanut butter in every glorious, satisfying bite. Get ready for a dessert that will make you exclaim, “WHOA. NELLY!”
There’s simply no convincing me that peanut butter isn’t one of the greatest culinary gifts. Its versatility shines, equally at home in savory dishes—like a delectable peanut chicken—as it is in the most decadent desserts. However, my deep affection for peanut butter comes with exceptionally high standards, especially when it takes center stage in a sweet treat. I’ve spent years perfecting peanut butter recipes, ensuring each one delivers an unforgettable experience.
The Quest for the Perfect Peanut Butter Pie
My dedication to peanut butter excellence has led us down many delicious paths. We rigorously tested countless batches until our taste buds were practically made of peanut butter, all to uncover the definitive classic peanut butter cookie recipe—you know, the one with those iconic fork prints on top. And who could forget those legendary lunch lady peanut butter bars? Or the comforting embrace of peanut butter banana bread? Each recipe was a journey, a pursuit of perfection.
This obsession with perfection, particularly when it comes to peanut butter, is precisely why I resisted developing a peanut butter pie recipe for over a decade. None I encountered truly earned that “eye-rolling good” distinction. But then, one magical weekend, I experimented, tossing together a medley of ingredients without precise measurements, relying purely on instinct. The result? Pure culinary bliss.
MY GOODNESS! It was everything I had ever dreamed of in a peanut butter pie and more. The perfect balance of sweet and salty, creamy and crunchy, all culminating in a dessert that was effortlessly elegant yet incredibly satisfying. This pie, born from a spontaneous moment of creation, finally met my impossibly high standards.
A Symphony of Flavors and Textures: The Components of Our Ultimate Pie
What makes this peanut butter pie truly ultimate? It’s a carefully crafted symphony of flavors and textures, designed to delight from the first glance to the last crumb. This no-bake wonder is ideal for any occasion, from casual family gatherings to elegant holiday feasts. Let’s delve into the essential ingredients that come together to create this magnificent dessert.
Key Ingredients for Your Dream Pie
As you might guess, peanut butter and chocolate play leading roles, and there’s plenty of both! While these two are undoubtedly the stars, a few other simple ingredients complete this easy yet decadent dessert. Here’s your comprehensive shopping list to bring this dream pie to life:
For the Perfect Chocolate Crust
- Chocolate Graham Crackers: Providing a unique depth of flavor and a sturdy base.
- Granulated Sugar: For just the right touch of sweetness.
- Unsalted Butter: The binding agent that makes the crust perfectly crumbly yet firm.
- A Pinch of Salt: To enhance all the chocolate and peanut butter flavors.
For the Dreamy Peanut Butter Filling
- Full-Fat Cream Cheese: The secret to an incredibly smooth and rich texture, with a subtle tang.
- Creamy Peanut Butter: The heart of the pie; choose a high-quality brand for the best flavor (we love Skippy for its consistency).
- Sweetened Condensed Milk: Adds luscious sweetness and helps achieve that irresistible creamy consistency.
- Powdered Sugar: To sweeten the filling without adding grittiness.
- Cool Whip: Folds in air for a light, fluffy, and perfectly scoopable filling.
For the Decadent Toppings
- Mini Unwrapped Reese’s Cups: The quintessential peanut butter and chocolate pairing, in bite-sized perfection.
- Mini Wrapped Reese’s (Halved): Adds another layer of iconic flavor and visual appeal.
- Peanut Butter Chips: Intensify the peanut butter experience with delightful bursts of flavor.
- Semi-Sweet Chocolate Chips: Provides complementary chocolate notes and a lovely texture contrast.
- Melted Semi-Sweet Chocolate Chips: For a beautiful drizzle that adds extra chocolatey goodness.
Detailed measurements for each ingredient, along with comprehensive instructions, are conveniently located in the recipe card at the conclusion of this post. You can easily save and print the complete recipe from there.
Crafting the Perfect Chocolate Pie Crust
The foundation of this incredible pie is its chocolate crust, and you have two fantastic options, each offering a slightly different profile:
- Chocolate Graham Cracker Pie Crust: This is my personal favorite. While it might be a tad more crumbly than a traditional graham cracker crust, it offers a beautifully balanced sweetness that harmonizes perfectly with the rich peanut butter filling. It’s less intensely sweet than an Oreo crust, allowing the peanut butter to truly shine.
- Oreo Cookie Crust: For those who crave an intensely chocolatey and slightly denser base, an Oreo crust is an excellent choice. Its deep chocolate flavor creates a bolder contrast with the peanut butter filling. If you choose this path, here’s the simple recipe:
Simple Oreo Pie Crust Recipe
- 25 Oreo cookies, finely crushed (filling and all)
- 4 tablespoons unsalted butter, melted
- In a medium bowl, combine the finely crushed Oreos and the melted butter. Stir until the crumbs are evenly moistened.
- Evenly press the mixture into a 9-inch or 10-inch deep-dish pie plate, ensuring it extends up the sides. Use the back of a spoon or your fingers to compact it firmly.
- Bake the crust in a preheated oven at 350°F (175°C) for 8 minutes. This brief baking time helps to set the crust, making it more stable and less prone to crumbling when sliced. Set it aside to cool completely before adding the filling.
How to Make The Ultimate Peanut Butter Pie: A Step-by-Step Guide
While pies can sometimes seem intimidating, this no-bake recipe is incredibly straightforward and stress-free. Each step is designed for ease, ensuring a stunning and delicious result. Follow these basic steps to create your ultimate peanut butter pie:
For the Crust
- Preheat your oven to 350°F (175°C).
- In a bowl, combine the crushed chocolate graham crackers (or Oreos), sugar, and salt. Stir well to ensure all ingredients are evenly distributed.
- Pour in the melted butter and mix thoroughly until the crumbs are uniformly moistened and hold together when squeezed.
- Press the mixture firmly into your chosen pie plate, making sure to create an even layer across the bottom and up the sides. A glass measuring cup can help achieve a compact, smooth surface.
- Bake the crust for 8 minutes, then remove it from the oven and set it aside to cool completely while you prepare the filling.
For the Dreamy Peanut Butter Filling
- In a large mixing bowl, use a hand mixer to beat the softened cream cheese until it is light and perfectly smooth, with no lumps.
- Add the sweetened condensed milk and creamy peanut butter to the bowl. Continue mixing until the ingredients are thoroughly combined and the mixture is smooth and cohesive.
- Scrape down the sides of the bowl with a rubber spatula to ensure everything is incorporated. Add the powdered sugar and beat again until the mixture is fully combined and silky smooth. Scrape the sides one more time.
- Gently add half of the Cool Whip (or stabilized whipped cream) to the peanut butter mixture. Using your rubber spatula, carefully fold the whipped topping into the peanut butter mixture until just combined and the color is uniform.
- Add the remaining Cool Whip and continue to gently fold until no streaks of white remain and the filling is light and airy. Be careful not to overmix, as this can deflate the whipped topping.
- Scoop the entire filling into the cooled pie crust, spreading it evenly with the spatula to create a smooth surface.
- Cover the pie tightly with plastic wrap or a pie lid and refrigerate for at least 3-4 hours, or preferably overnight, to allow the filling to set completely. This chilling time is crucial for the pie to hold its shape when sliced.
- Just before serving, generously top the chilled pie with the mini Reese’s cups, peanut butter chips, and chocolate chips. For an extra touch of decadence, drizzle melted semi-sweet chocolate over the top.
Pro Tips for Peanut Butter Pie Perfection
Achieving the perfect peanut butter pie is easier with a few insider tips. These simple tricks will elevate your dessert from great to truly unforgettable.
Mastering Soft Cream Cheese
The cream cheese absolutely *must* be softened to room temperature before you begin this recipe. If it’s cold, your filling will be lumpy, and nobody wants a lumpy pie! I know the frustration of wanting to bake but realizing all the key ingredients are still chilling in the fridge. Fear not, there are solutions!
- Plan Ahead: The easiest method is to simply pull the cream cheese out of the refrigerator about 30 minutes to an hour before you plan to start mixing.
- Quick Soften: If you’re short on time, place the cream cheese (still in its foil wrapping, or in a zip-top bag if unwrapped) into a bowl of warm (not hot!) water for about 10-15 minutes. Alternatively, you can microwave it on low power (e.g., 50% power) for 10-15 second intervals, flipping it each time, until softened. Crisis averted!
Cool Whip vs. Homemade Whipped Cream
While Cool Whip offers incredible convenience and stability, you can absolutely use homemade whipped cream for this pie if you prefer. To ensure your homemade whipped cream holds its shape and doesn’t weep, I highly recommend making stabilized whipped cream. This involves adding a little gelatin or cornstarch to your heavy cream before whipping. For this recipe, you’ll need to whip approximately 2/3 cup of heavy whipping cream until stiff peaks form. Once whipped, this should yield about 1 ¼ cups, mirroring the volume of Cool Whip needed.
Make-Ahead and Storage Solutions
This pie is an excellent make-ahead dessert, perfect for entertaining! You can prepare the entire pie, including the filling and crust, a day in advance. Simply add the toppings just before serving for the freshest look and texture.
- Refrigerator Storage: Any leftover slices should be covered tightly with plastic wrap or placed in an airtight container and refrigerated. It will maintain its delicious freshness for 3-4 days.
- Freezer Storage: For longer storage, wrap individual slices or the entire leftover pie (if unsliced) tightly in plastic wrap, then an additional layer of aluminum foil. Place it in the freezer, and it will keep beautifully for up to 3 months. Thaw in the refrigerator for a few hours before serving.
Why This Pie Reigns Supreme: A Masterpiece of Contrast
I genuinely adore every facet of this pie. It’s a culinary masterpiece built on delightful contrasts. The filling is sumptuously creamy, yet the chocolate graham cracker (or Oreo) crust provides a satisfying crunchy counterpoint. The texture is wonderfully smooth, while the generous candy bits on top add playful, delightful chunks. Best of all, despite its incredibly decadent appearance and flavor, it is surprisingly easy to prepare, making it suitable for any occasion, from a casual weeknight treat to a show-stopping holiday dessert.
This truly is the peanut butter pie I have been dreaming of and waiting for for over a decade. It’s the culmination of a passion for peanut butter, perfected into a single, irresistible dessert.
Explore More Peanut Butter Delights You’ll Love:
- Peanut Butter Bars
- Peanut Butter Blossoms
- Chocolate Peanut Butter Balls
- Peanut Butter Meltaway Cookies
- Peanut Butter Icebox Cake
- Classic Peanut Butter Cookies
- Peanut Butter Sheet Cake
The Ultimate Peanut Butter Pie
By Carrian Cheney
Prep Time: 30 mins
Cook Time: 8 mins
Servings: 10 slices
Rating: 2.96 from 49 votes
Chocolate pie crust loaded with an absolutely dreamy peanut butter filling and covered, absolutely covered in Reese’s, peanut butter chips and chocolate chips. WHOA. NELLY!
Ingredients
Chocolate Crust (see note)
- 2 Cups Crushed Chocolate Graham Crackers
- 1/3 Cup Sugar
- 1 Pinch Salt
- 8 Tablespoons Butter, Melted
Peanut Butter Filling
- 8 Ounces Cream Cheese, Softened – see note
- 1/3 Cup Sweetened Condensed Milk
- 1 Cup Creamy Peanut Butter, we like Skippy
- 1/2 Cup Powdered Sugar
- 1 ¼ Cups Cool Whip
Toppings
- 1 Bag Mini Unwrapped Reese’s Peanut Butter Cups
- 3.1 Ounce Bag Mini Reese’s Peanut Butter Cups, Halved
- 1/3 Cup Peanut Butter Chips
- 1/3 Cup Semi-Sweet Chocolate Chips (Milk chocolate is also fine)
- ¼ – ⅓ Cup Semi-Sweet Chocolate Chips, melted (for drizzle)
Instructions
For the Crust
- Heat the oven to 350°F (175°C).
- Stir together the graham cracker crumbs, sugar, and salt. Add the melted butter and stir to combine thoroughly.
- Press the mixture firmly into a 10-inch deep-dish pie plate, ensuring crumbs are pressed up the sides. A 9-inch pie plate also works; a 10-inch will result in a slightly thinner crust, while a 9-inch will yield a thicker crust.
- Bake for 8 minutes and set aside to cool completely.
For the Filling
- In a bowl, using a hand mixer, beat the softened cream cheese until it is smooth and creamy. Add the sweetened condensed milk and peanut butter, then mix again until the mixture is uniform and smooth.
- Scrape down the sides of the bowl. Add the powdered sugar and beat again until everything is evenly combined and the mixture is silky. Scrape down the sides of the bowl once more.
- Add half of the Cool Whip (or stabilized whipped cream). Using a rubber spatula, gently fold it into the peanut butter mixture until just combined and the color is lightened. Add the remaining whipped cream and fold until fully incorporated.
- Very gently scoop all of the filling into the cooled crust at once, then carefully spread it evenly across the entire pie. Cover the pie with plastic wrap or a pie lid and refrigerate for a minimum of a few hours, or ideally overnight, to allow it to set firmly.
- Just before serving, top the chilled pie generously with all the specified candies and chips. Then, drizzle the melted chocolate over the top for a decadent finish.
Recipe Notes
- Crust Option: Remember, you can also opt for an Oreo pie crust using the recipe provided in the main article body.
- Cream Cheese Softening: It is absolutely essential that your cream cheese is softened to room temperature. If it’s not, your filling will be lumpy. This generally takes 15-30 minutes on the counter, or you can speed it up by placing it in a zip-top bag and running warm water over it for a few minutes.
Nutrition Information (Approximate per serving)
- Serving: 1 slice
- Calories: 599 kcal
- Carbohydrates: 49g
- Protein: 11g
- Fat: 42g
- Saturated Fat: 18g
- Polyunsaturated Fat: 5g
- Monounsaturated Fat: 15g
- Trans Fat: 0.4g
- Cholesterol: 57 mg
- Sodium: 364 mg
- Potassium: 317 mg
- Fiber: 2g
- Sugar: 35g
- Vitamin A: 673 IU
- Vitamin C: 0.3 mg
- Calcium: 87 mg
- Iron: 1 mg
Nutrition information is automatically calculated and should only be used as an approximation.